1. replacing window seals - how does it work?
2. expert advice: How to replace and seal your UPVC windows yourself
3. installation in the corner area
3.1 Corner variant 1 - fold over and cut out the seal base
3.2 Corner variant 2 - 45 degree angle
3.3 Aids for installation
Wooden windows
4. professional tips for replacing window seals on wooden windows
4.1 Simple corner variant - 45 degree angle with template
4.2 Corner variant - V-cut
5 Why is it important to check and replace window seals regularly?
6 When should window seals be replaced?
7. how can I save energy costs by replacing the window seal?
1. replacing window seals - how does it work?
Before installation: To replace seals on windows and doors, it is necessary to carefully remove the old, porous rubber. Make sure that no residue from the old adhesive and rubber remains. The old sealing material is often brittle and difficult to remove and is best loosened with a pointed object. For easier removal, it is recommended to cut the sealing tape with a cutter knife and treat it withSilikonspray Although the process of removing the seal is tedious and labour-intensive, it makes it easier to install new sealing profiles. Another set of tools for removing the old rubber seal and rolling in the new one can be found here.
The new sealing material is cut to size and fitted piece by piece. Regular maintenance of the seals can extend their service life and Heizkosten save money. Further details are explained in the following section:
The explanation for UPVC windows is given first and then below for wooden windows. You can find videos here:
2. expert advice: How to replace and seal your UPVC windows yourself
We recommend watching our video on how to install UPVC windows yourself first:
There are various ways to fit window seals to UPVC windows. The seal shape or seal size often determines the appropriate installation method. We basically differentiate between four types of gasket:
1. frame (part attached to the building structure)
2. window sash (movable part of the window)
3. center seal (arranged in the middle of the window, in this case the frame seal is omitted)
4. glazing seal (for fixing the glass pane - very difficult to install)
BasicsStart at the top center by pressing the sealing foot of the seal into the groove. Now lay the rubber seal all the way around by pressing the seal base into the groove without pulling the material along. The corners are fitted differently depending on the sealing profile (see below). Leave 1 cm of the sealing strip protruding at the end. The protruding part is also pressed into the groove. If necessary, the sealing joint and corners can be additionally glued to prevent the window seal from moving due to weather influences.
It is important to ensure that the sealing material is not pulled long, as the window seal could otherwise contract again and create a gap. This is why we cut off 1 cm more.
Another tipTo insert the seal, a clean cloth can be dampened with a drop of washing-up liquid and a little water. The gasket base is pulled through the cloth so that it slides more smoothly into the groove.
3. installation in the corner area
Corner variant 1 - Fold over and cut out the sealing foot
The process consists of four steps: Starting at the top center the sealing foot of the window seal is pressed into the groove. At the corners, the gasket base is removed in order to place the gasket around the corner.
This is how it worksOnly remove the gasket base in the corner area over a width of 1.5 to 2 cm - the gasket body remains in place. We remove the gasket base because the gasket material adapts to the window and is not excessively bulky. Repeat this step at all four corners.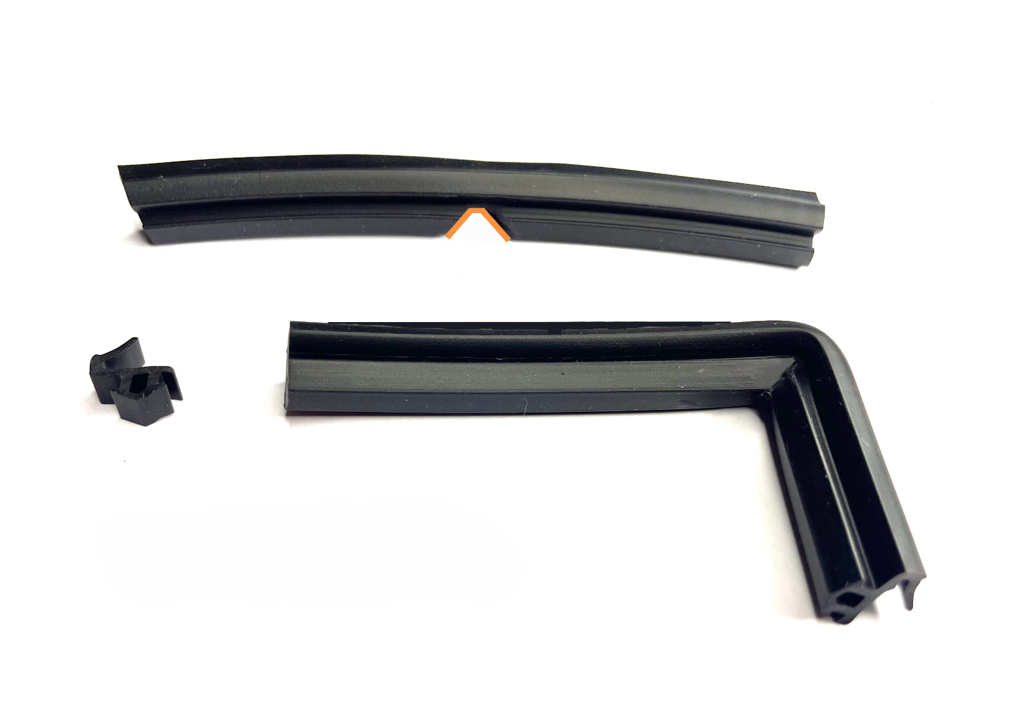
Back at the starting point - top center - please allow 1 cm of the window seal to protrude and fix it in the groove (see basic principles).
Please note: It can happen that the newly installed seal becomes wavy because there is too much material in the seal groove and the material is flexible. Wait one or two days and check the rubber seal. If the material is still wavy, shorten the 1 cm (0.5 cm) protruding from the top center to 0.5 cm (5mm). Then press the seal back into the groove and glue it in place. The window can be closed as usual while waiting 1-2 days until it is perfectly fitted.
Corner variant 2 - 45 degree angle
With large gaskets, e.g. center gaskets, it is not possible to fold them over in the corner area. In this case, it is advisable to cut the window gaskets to 45 degree angle in all four corner areas andand to glue the gasket joint.
How can I cut my window seals to 45 degrees?
To cut the window seals to 45 degrees, you can use our Gehrungsschablone tool. This allows you to cut the seal precisely so that the corners fit together perfectly and ensure a tight connection.
The following tools are required for installation:
1. tape measure or folding rule to measure the seal
2. household scissors to cut the seal to size
3. optionally some washing-up liquid or Silikonspray to rub into the gasket groove (if the new gasket is difficult to press into the gasket groove)
4. optional: seam roller (also used for wallpapering). This can be used to press the window seal evenly into the groove.
5. optional: Schablonen For the miter cut
After installation, please check that the seal is firmly seated. Thefinal bonding of the seal should only be after completion of the entire window seal installation be carried out.
The installation of glass window seals
It is not advisable to replace the window seals for the glass pane without prior experience of replacing seals. Removing the glass pane is more difficult and requires experience. Consultation with specialist personnel is advisable.
A cross-section of the seal is also necessary to determine the glazing seal.
4. professional tips for replacing window seals on wooden windows
Here you will find videos on how to correctly determine your seal with explanations on the groove and rebate height and how to install wooden window seals yourself.
Simple corner variant - 45 degree angle with template
Here you have the option of installing the seal individually. Four sealing parts are required, consisting of two horizontal and two vertical parts.
It is recommended that the seals only after all the windows have been installedas the adhesive dries very quickly. Spot gluing means 1 drop of adhesive in the corner area between the back of the seal and the window frame. In addition, one drop in the middle between each of the four corner areas to sufficiently fix the seal. It is not necessary to glue the miter cut.
Information on the templateWe have developed a template for the installation of new window seals, which is a cost-effective and practical solution for everyone. This template makes replacement easier and ensures a neat and efficient job. This means that even non-professionals can replace the seals easily and professionally without having to buy expensive tools.
The background to this is that gasket replacement on wooden windows is usually carried out by carpenters or joiners who have experience and the necessary tools. An expensive mitre cutter is required for the cut in the corner area, which makes the purchase uneconomical for the individual.
Corner variant - V - cut
During installation, it is important to ensure that the wooden window seal is installed without a gap in the corners and at the joint edges. The gasket joint should be at the top and the window gasket should not be compressed or overstretched during installation. The gaskets can be easily replaced in the straight area, which is why we will only focus on the different variants in the corner area in our examples..png)
To install the window gasket in the corner area, a V-cut is made and the gasket is then folded over. To do this, about 2/3 of the seal is cut out with the V-cut to fit the corner. The upper part of the seal (approx. 1/3) is left in place so that the window seal remains as a whole.
The process is carried out in four steps: Starting at the top center, press the sealing foot of the window seal into the groove. At the first corner, the V-cut is made by hand (a triangle may help here for the 45° cut). After joining, the butt edges can be glued together. You can find installation instructions here:
5 Why is it important to check and replace window seals regularly?
It is essential to regularly check and replace the seals on windows and doors. They contribute to good insulation, less draughts, Energieeinsparung and a pleasant indoor climate. They also prevent the formation of mold and condensation as well as general damage caused by moisture ingress.
6 When should window seals be replaced?
Window seals should be replaced if they have become hard or severely deformed, if gaps are visible between the frame and seal or if the Papiertest seal is inadequate. However, it makes sense to replace them after 15 to 20 years at the latest to save energy and prevent draughts.
7 How can I save energy costs by replacing the window seal?
By replacing leaking windows, you can Energiekostensave money. It prevents heat loss, cold and moisture, which in turn reduces the need for heating or air conditioning. Choose a high-quality and durable rubber seal from TPE orSilikon and make sure it is fitted professionally (see above) for optimum insulation. Living comfort is increased and the investment pays off.